Blog
Screen capture and recording software has become indispensable in 2024 for a variety of users, from educators and gamers to business professionals and content creators. Whether you're creating instructional videos, live streaming your gameplay, or recording webinars, the right software can significantly enhance your productivity and the quality of your content.
With the plethora of options available in 2024, choosing the best tool can be overwhelming. This comprehensive guide will help you navigate through the best screen capture and recording software available today, based on different use cases and features.
What Makes a Good Screen Capture and Recording Software?
Before diving into the best options, it’s important to understand the key features that make a screen capture and recording software stand out. Here are some essential criteria to consider:
- Recording Capabilities: Ability to capture the entire screen, specific windows, or custom areas. It should also support recording from webcams and external audio sources like microphones.
- Audio Recording: Capability to record system audio and microphone simultaneously.
- Editing Tools: Built-in editing features such as trimming, annotations, transitions, and effects can save you from needing additional software.
- Export Options: Support for various formats like MP4, AVI, and GIF, with high-quality outputs.
- User Interface: A user-friendly interface that is easy to navigate, even for beginners.
- Performance: Efficient use of system resources to avoid lags and crashes during recording.
- Price: Cost-effectiveness, with free versions or trials available to test before committing to a purchase.
- Additional Features: Unique features like green screen effects, scheduled recordings, or integration with other tools.
Comparison of the Top 6 Screen Capture and Recording Software in 2024
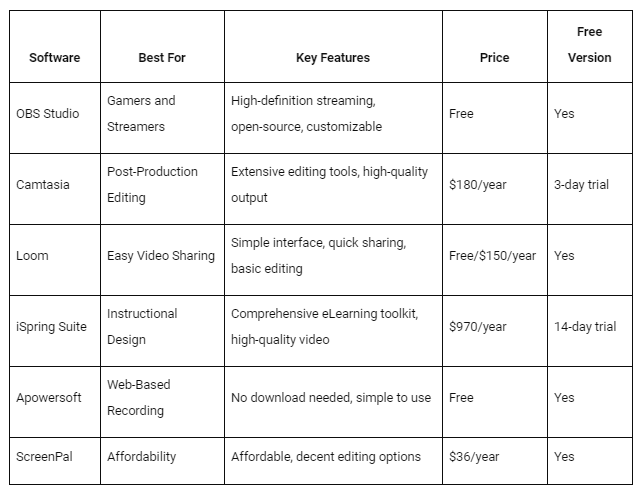
Review of the Top 6 Screen Capture and Recording Software in 2024
OBS Studio – Best for Screen Recorder for Gamers and Streamers
OBS Studio (Open Broadcaster Software) is a powerful, open-source software widely used by gamers and streamers. It supports high-definition streaming and recording without any restrictions on video length. OBS Studio can record directly from your graphics card, making it ideal for capturing gameplay in full-screen mode.
Key Features
- High-Definition Recording and Streaming: OBS Studio supports HD streaming and recording, allowing you to capture stunningly clear videos.
- Scene Composition: Users can create scenes made up of multiple sources, including window captures, images, text, browser windows, webcams, capture cards, and more.
- Real-Time Video and Audio Capturing and Mixing: You can mix an unlimited number of sources and use transitions for a professional broadcast.
- Customizable Transitions: Choose from a variety of customizable transitions to add a professional touch to your recordings.
- Intuitive Audio Mixer: The audio mixer comes with per-source filters such as noise gate, noise suppression, and gain.
- Modular ‘Dock’ UI: The user interface allows you to arrange the layout exactly as you like.
- Studio Mode: Allows you to preview your scenes and sources before pushing them live.
- Multiview: With the multiview feature, you can monitor eight different scenes and easily cue or transition any of them to your main scene with a single or double click.
Detailed Analysis
User Interface and Usability: The OBS Studio interface can initially seem daunting, especially for beginners. However, once you become familiar with the layout and functionality, the software reveals itself as incredibly versatile. The modular ‘Dock’ UI is particularly useful, allowing users to customize their workspace according to their needs.
Performance: OBS Studio is highly efficient in terms of resource usage, making it suitable for use even on less powerful systems. It leverages your GPU to provide high-quality video without overburdening your CPU.
Customization and Flexibility: One of the strongest points of OBS Studio is its customization capabilities. You can set up different scenes for different purposes, switch between them effortlessly, and even use hotkeys for faster operation. The variety of plugins available also allows you to extend its functionality.
Integration and Compatibility: OBS Studio integrates seamlessly with various streaming platforms like Twitch, YouTube, and Facebook Live. This makes it a favorite among streamers who want a robust, reliable solution.
Pros:
- Free and open-source
- Supports high-definition streaming and recording
- Highly customizable with a plethora of plugins
- No watermark or time limits
- Strong community support and frequent updates
Cons:
- Steep learning curve
- Interface can be overwhelming for beginners
- No built-in editing tools (requires separate software for post-production editing)
Use Case: OBS Studio is ideal for gamers, streamers, and tech-savvy users who need robust recording capabilities and extensive customization options. It's also suitable for creating professional live broadcasts and presentations.
Tips for Getting the Most Out of OBS Studio
- Explore Plugins: Take advantage of the extensive library of plugins available for OBS Studio. These can add new features and enhance the software’s functionality.
- Learn Keyboard Shortcuts: Familiarize yourself with OBS Studio’s keyboard shortcuts to streamline your workflow.
- Optimize Settings: Spend time tweaking the settings to optimize performance and ensure high-quality recordings. There are many guides available online to help with this.
- Use Scene Collections: Create different scene collections for different types of content (e.g., one for gaming, another for tutorials) to keep your setup organized.
- Regular Updates: Keep OBS Studio updated to benefit from the latest features and improvements.
Camtasia – Best for Post-Production Editing
Camtasia is a popular choice for those who need comprehensive editing features alongside screen recording. It offers a simple and effective recorder with powerful post-production tools, making it a favorite among educators and professional video creators.
Key Features
- Easy Screen Recording: Record your screen, webcam, or both simultaneously with ease.
- Powerful Editing Tools: Camtasia offers a wide range of editing tools, including trimming, transitions, animations, and effects.
- Annotations: Add annotations, callouts, and shapes to highlight important information in your videos.
- Pre-built Templates: Use pre-built templates to speed up the video creation process.
- Quiz and Interactivity Features: Add quizzes and interactivity to engage viewers.
- Asset Library: Access a vast library of royalty-free assets, including music tracks and sound effects.
- Export Options: Export your videos in various formats and directly share them on platforms like YouTube, Vimeo, and Google Drive.
Detailed Analysis
User Interface and Usability: Camtasia’s interface is designed with user-friendliness in mind. Even those with little to no video editing experience can navigate through the software and create professional-quality videos.
Performance: While Camtasia is resource-intensive, it runs smoothly on most modern systems. The software can handle large projects without significant performance issues, making it suitable for creating long, detailed videos.
Customization and Flexibility: Camtasia excels in providing a range of customization options. The extensive library of templates and assets allows users to create videos that match their brand or style.
Integration and Compatibility: Camtasia integrates well with other software and platforms, allowing for easy sharing and collaboration. It’s compatible with both Windows and macOS, making it accessible to a wide range of users.
Pros:
- User-friendly interface
- Extensive editing features
- High-quality output
- Large library of assets
- Suitable for both beginners and professionals
Cons:
- Expensive compared to other options
- Limited free trial
- Resource-intensive
Use Case: Camtasia is perfect for users who need to create professional-looking videos with detailed editing, such as instructional designers, educators, and content creators. It’s also suitable for businesses looking to create training videos and presentations.
Tips for Getting the Most Out of Camtasia
- Utilize Templates: Use the pre-built templates to streamline your workflow and maintain consistency across your videos.
- Take Advantage of Annotations: Use annotations to highlight key points and guide viewers through your content.
- Explore Interactive Features: Add quizzes and interactivity to make your videos more engaging and informative.
- Optimize Export Settings: Choose the appropriate export settings to ensure the best quality for your videos.
- Regular Updates: Keep Camtasia updated to benefit from the latest features and improvements.
Loom – Best Screen Recording Software for Easy Video Sharing
Loom is designed for quick and easy screen capture and sharing. It’s an excellent tool for creating short videos to share with colleagues or clients. Loom supports up to 720p recording with system sounds and offers simple editing features.
Key Features
- Quick Recording: Start recording your screen, webcam, or both with just a few clicks.
- Instant Sharing: Share your recordings instantly with a simple link.
- Basic Editing: Trim and edit your videos within the Loom interface.
- Viewer Insights: Track who has viewed your videos and get detailed insights.
- Integrations: Integrates with popular tools like Slack, Google Drive, and Trello.
- Multiple Platforms: Available on Windows, macOS, and as a browser extension.
Detailed Analysis
User Interface and Usability: Loom’s interface is designed for simplicity and ease of use. The minimalistic design ensures that even beginners can start recording and sharing videos without any hassle.
Performance: Loom performs well on most systems, offering smooth recording and playback. The software is lightweight and does not require significant system resources.
Customization and Flexibility: While Loom does not offer extensive customization options, it provides enough features to create effective short videos. The basic editing tools are sufficient for trimming and adjusting recordings.
Integration and Compatibility: Loom integrates seamlessly with various productivity tools, making it easy to share and collaborate on videos. The browser extension adds to its versatility, allowing users to record directly from their web browser.
Pros:
- Easy to use and set up
- Quick sharing capabilities
- Free version available
- Integration with popular tools
Cons:
- Limited recording time in the free version
- Basic editing features
- Lower video quality compared to other tools
Use Case: Loom is ideal for corporate communications, remote teams, and anyone needing to create and share quick instructional videos. It’s also suitable for educators who want to create short, engaging lessons.
Tips for Getting the Most Out of Loom
- Use the Browser Extension: The browser extension allows for quick and easy recording directly from your web browser.
- Take Advantage of Integrations: Integrate Loom with your favorite productivity tools to streamline your workflow.
- Utilize Viewer Insights: Track viewer engagement to understand how your videos are received.
- Optimize Recording Settings: Adjust the recording settings to ensure the best quality for your videos.
- Regular Updates: Keep Loom updated to benefit from the latest features and improvements.
iSpring Suite – Best Screen Recording Software for Instructional Design

iSpring Suite is an eLearning authoring toolkit that includes a powerful screen recording tool. It’s perfect for educators and instructional designers looking to create high-quality instructional videos.
Key Features
- Comprehensive eLearning Toolkit: Includes tools for creating courses, quizzes, interactions, and simulations.
- High-Quality Screen Recording: Record your screen, webcam, and audio with high quality.
- Easy Editing: Edit your recordings with ease, adding annotations, transitions, and effects.
- Interactive Features: Add quizzes and interactivity to engage viewers.
- Asset Library: Access a vast library of templates, characters, and backgrounds.
- Seamless Integration: Integrates with various Learning Management Systems (LMS).
Detailed Analysis
User Interface and Usability: iSpring Suite offers a user-friendly interface that is easy to navigate. The software is designed to be accessible to users of all skill levels, making it a great choice for educators and instructional designers.
Performance: iSpring Suite performs well on most systems, offering smooth recording and editing capabilities. The software is optimized for creating high-quality instructional content.
Customization and Flexibility: iSpring Suite provides a wide range of customization options, allowing users to create content that matches their educational objectives. The extensive library of templates and assets further enhances its flexibility.
Integration and Compatibility: iSpring Suite integrates seamlessly with various LMS platforms, making it easy to deploy and track your eLearning content. It’s compatible with both Windows and macOS.
Pros:
- Comprehensive set of features for course creation
- High-quality video output
- User-friendly interface
- Extensive asset library
Cons:
- Expensive
- Overkill for users who only need screen recording
Use Case: iSpring Suite is best suited for educators and instructional designers who need a complete eLearning solution. It’s also suitable for businesses looking to create professional training videos and courses.
Tips for Getting the Most Out of iSpring Suite
- Utilize Templates: Use the pre-built templates to speed up your course creation process.
- Take Advantage of Interactive Features: Add quizzes and interactivity to make your courses more engaging.
- Optimize Export Settings: Choose the appropriate export settings to ensure the best quality for your videos and courses.
- Regular Updates: Keep iSpring Suite updated to benefit from the latest features and improvements.
Apowersoft Free Online Screen Recorder – Best Web-Based Solution
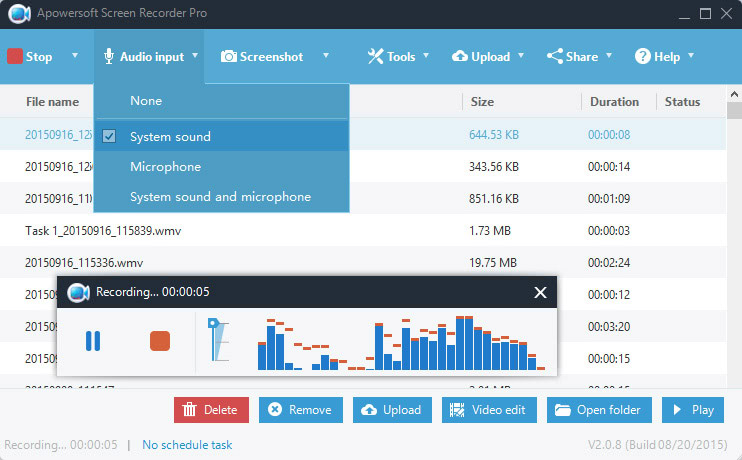
Apowersoft offers a free, web-based screen recording solution that doesn’t require any downloads. It’s great for users who need a quick and easy way to record their screen without installing software.
Key Features
- No Download Required: Record your screen directly from your web browser.
- Simple Interface: User-friendly interface that is easy to navigate.
- High-Quality Recording: Capture high-quality video and audio.
- Webcam and Audio Support: Record from your webcam and microphone.
- Flexible Export Options: Export your recordings in various formats.
Detailed Analysis
User Interface and Usability: Apowersoft’s web-based screen recorder is designed for simplicity and ease of use. The interface is intuitive, making it accessible to users of all skill levels.
Performance: The web-based nature of Apowersoft’s screen recorder means it’s dependent on your internet connection. However, it performs well and offers high-quality recordings.
Customization and Flexibility: While Apowersoft does not offer extensive customization options, it provides enough features to create effective screen recordings. The flexible export options are a plus.
Integration and Compatibility: As a web-based solution, Apowersoft is compatible with all major web browsers and platforms, making it highly versatile.
Pros:
- No download required
- Quick to get started
- High-quality recording
- Free
Cons:
- Limited features
- Dependent on internet connection
Use Case: Apowersoft is ideal for users who need a quick recording solution and don’t want to install additional software. It’s also suitable for those who work on multiple computers or need to record in different environments.
Tips for Getting the Most Out of Apowersoft
- Ensure Stable Internet Connection: A stable internet connection is crucial for high-quality recordings.
- Optimize Recording Settings: Adjust the recording settings to ensure the best quality for your videos.
- Use for Quick Recordings: Utilize Apowersoft for quick and simple recordings when you don’t need extensive editing features.
- Regular Updates: Keep Apowersoft updated to benefit from the latest features and improvements.
ScreenPal (formerly Screencast-O-Matic) – Best for Affordability
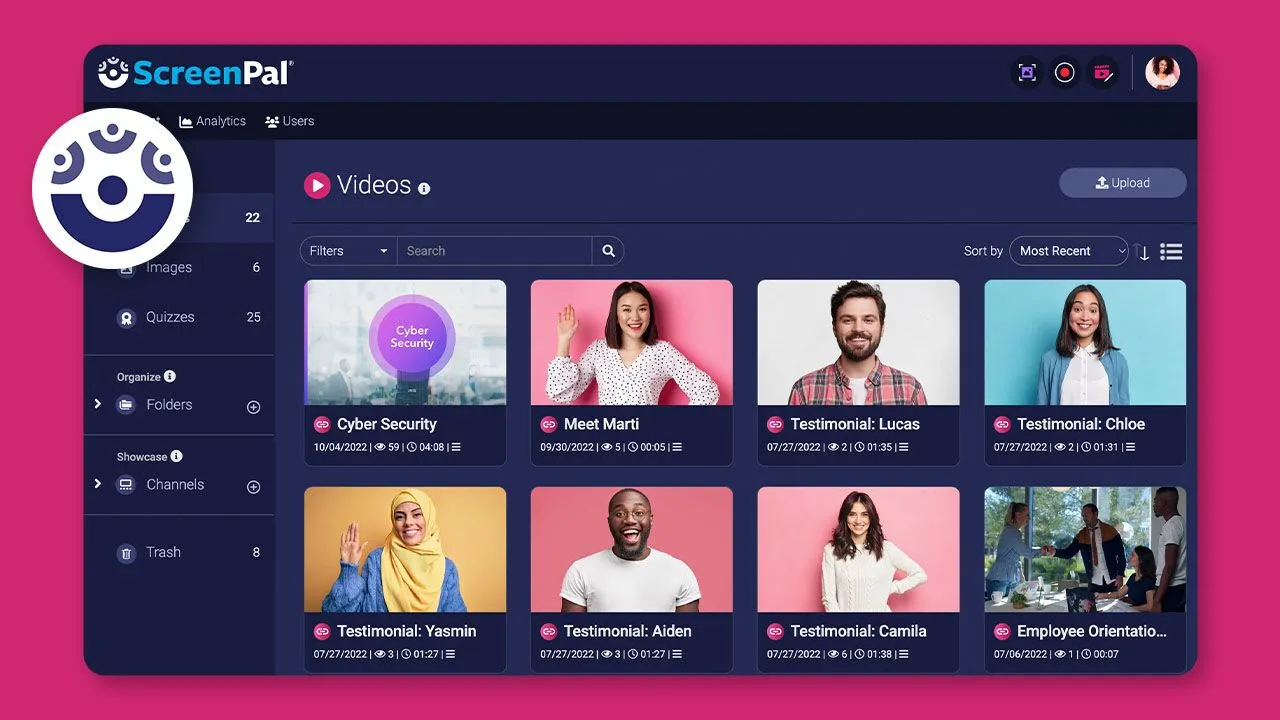
ScreenPal is an affordable screen recording solution that offers a wide range of features at a low cost. It’s perfect for users who need a reliable screen recorder without breaking the bank.
Key Features
- Easy Screen Recording: Record your screen, webcam, or both with ease.
- Basic Editing Tools: Trim and edit your recordings within the ScreenPal interface.
- Annotations: Add annotations and callouts to highlight important information.
- Affordable Pricing: Low-cost subscription plans with generous features.
- Cloud Storage: Store and share your recordings in the cloud.
Detailed Analysis
User Interface and Usability: ScreenPal offers a user-friendly interface that is easy to navigate. The software is designed to be accessible to users of all skill levels, making it a great choice for everyday use.
Performance: ScreenPal performs well on most systems, offering smooth recording and playback. The software is lightweight and does not require significant system resources.
Customization and Flexibility: While ScreenPal does not offer extensive customization options, it provides enough features to create effective screen recordings. The basic editing tools are sufficient for trimming and adjusting recordings.
Integration and Compatibility: ScreenPal integrates well with various cloud storage services, making it easy to share and collaborate on videos. It’s compatible with both Windows and macOS.
Pros:
- Affordable pricing
- Easy to use
- Decent editing options
- Cloud storage
Cons:
- Limited features in the free version
- Basic compared to more expensive options
Use Case: ScreenPal is ideal for budget-conscious users who need a reliable screen recording tool for everyday use. It’s also suitable for educators and small businesses looking for an affordable solution.
Tips for Getting the Most Out of ScreenPal
- Utilize Cloud Storage: Store and share your recordings in the cloud for easy access and collaboration.
- Optimize Recording Settings: Adjust the recording settings to ensure the best quality for your videos.
- Use Annotations: Add annotations and callouts to highlight key points in your recordings.
- Regular Updates: Keep ScreenPal updated to benefit from the latest features and improvements.
Also Read : Ultimate Guide to Creating Engaging Training Videos for Business Success in 2024
How We Tested The Best Software for Screen Capture and Recording ?
To provide you with a comprehensive and reliable guide, we conducted a thorough testing process for each of the screen capture and recording software mentioned in this article. Here’s an overview of our testing methodology:
1. Installation and Setup
- Ease of Installation: We evaluated how straightforward the installation process was for each software, noting any issues or complexities encountered during setup.
- Initial Configuration: We assessed how easy it was to configure the software for first use, including any necessary adjustments to settings for optimal performance.
2. User Interface and Usability
- Interface Design: We examined the user interface of each software, looking for ease of navigation, clarity of controls, and overall user-friendliness.
- Learning Curve: We considered how quickly a new user could become proficient with the software, noting any learning aids such as tutorials or guides.
3. Recording Capabilities
- Screen Recording: We tested the ability of each software to capture the entire screen, specific windows, and custom areas.
- Audio Recording: We evaluated the software's capability to record system audio and microphone input simultaneously.
- Webcam Integration: We assessed how well each software integrated with webcams for picture-in-picture recordings.
4. Performance
- Resource Usage: We monitored the impact of the software on system resources during recording, noting any lag or crashes.
- Quality of Recordings: We analyzed the clarity and resolution of the recorded video and audio.
5. Editing Tools
- Built-in Editing: We evaluated the editing features available within the software, such as trimming, annotations, transitions, and effects.
- Ease of Editing: We considered how intuitive and effective the editing tools were in enhancing the recordings.
6. Export Options
- File Formats: We checked the variety of export formats supported by the software, including common formats like MP4, AVI, and GIF.
- Quality of Exports: We assessed the quality of the exported files and any options for adjusting export settings.
7. Additional Features
- Unique Features: We identified any standout features such as green screen effects, scheduled recordings, or integration with other tools.
- Customizability: We evaluated the extent to which users could customize the software to fit their specific needs.
8. Support and Documentation
- User Support: We examined the availability and responsiveness of customer support for each software.
- Documentation: We reviewed the quality and comprehensiveness of user manuals, tutorials, and FAQs.
9. Pricing and Value
- Cost: We analyzed the pricing structure of each software, including any available free versions or trials.
- Value for Money: We assessed the overall value provided by the software in relation to its cost.
Conclusion
Choosing the right screen capture and recording software depends on your specific needs and use cases. Whether you're a gamer, educator, content creator, or business professional, there's a tool out there that fits your requirements. OBS Studio is perfect for gamers and streamers, Camtasia offers robust editing features, and Loom excels in quick and easy sharing. iSpring Suite is ideal for instructional designers, Apowersoft provides a hassle-free web-based solution, and ScreenPal offers affordability with a range of features.
FAQs about Screen Capture and Recording Software
1. What is screen recording?
Screen recording, also known as screen capture, is the process of recording everything that is displayed on your computer screen. This can include video, audio, and any movements or actions you make on the screen. It is commonly used for creating tutorials, presentations, and gameplay videos.
2. What features should I look for in screen recording software?
When choosing screen recording software, consider the following features:
- Ability to record the entire screen, specific windows, or custom areas.
- Audio recording from both system sound and microphone.
- Integration with webcam for picture-in-picture recording.
- Built-in editing tools such as trimming, annotations, and transitions.
- Various export options and high-quality output.
- User-friendly interface and ease of use.
- Performance efficiency and low impact on system resources.
3. Can I use free screen recording software for professional purposes?
Yes, many free screen recording software options, such as OBS Studio, provide professional-grade features. However, some free tools may have limitations such as watermarks, time restrictions, or fewer editing options. For extensive professional use, you might consider investing in paid software for additional features and support.
4. How can I improve the audio quality of my screen recordings?
To improve audio quality:
- Use a high-quality external microphone instead of the built-in microphone.
- Record in a quiet environment to minimize background noise.
- Use software with noise reduction features.
- Adjust audio settings within the recording software to balance system audio and microphone input.
5. What is the best format to export my recordings?
MP4 is the most widely used and versatile format for exporting recordings due to its high quality and compatibility with most devices and platforms. Other common formats include AVI, MOV, and GIF, depending on your specific needs.
6. Can I record my screen and webcam simultaneously?
Yes, many screen recording software options, such as OBS Studio, Camtasia, and Loom, support simultaneous screen and webcam recording. This feature is useful for creating tutorials, presentations, and gameplay videos with a personal touch.
7. How can I avoid lag during screen recording?
To avoid lag:
- Ensure your computer meets the system requirements for the recording software.
- Close unnecessary applications and processes to free up system resources.
- Use a lower resolution and frame rate if your system struggles with high-definition recording.
- Consider using a dedicated graphics card to handle the recording process more efficiently.
8. Is it possible to schedule screen recordings?
Yes, some screen recording software, like iSpring Suite and Apowersoft, offer the ability to schedule recordings. This feature is useful for capturing webinars, live streams, or other events automatically without manual intervention.
9. Can I edit my screen recordings within the software?
Many screen recording software options include built-in editing tools. For example, Camtasia offers extensive editing features such as trimming, transitions, annotations, and effects. However, some software, like OBS Studio, may require separate video editing software for post-production.
10. How do I share my screen recordings?
Most screen recording software provides various sharing options, such as direct uploads to platforms like YouTube, Vimeo, or Google Drive. You can also export the recordings in a compatible format and manually upload them to your desired platform. Tools like Loom offer instant sharing via a link, making it easy to share videos with colleagues or clients.
11. Are there any privacy concerns with screen recording software?
When using screen recording software, it's important to be mindful of privacy:
- Ensure you have permission to record and share any content that includes other individuals or proprietary information.
- Use software from reputable developers to avoid security risks.
- Be aware of the data and permissions the software requests during installation and use.
12. Can I use screen recording software on multiple devices?
Yes, many screen recording software options are compatible with multiple devices and platforms. For example, OBS Studio works on Windows, macOS, and Linux, while Loom is available on both desktop and mobile devices. Some tools, like Apowersoft, are web-based and can be used on any device with a web browser.
13. What are the common problems with screen recording software, and how can I solve them?
Common problems include:
- Watermarks: Use software that doesn’t add watermarks or consider upgrading to a paid version.
- Background Noise: Use a good quality microphone and record in a quiet environment. Some software offers noise reduction features.
- Wrong File Format: Ensure the software supports the necessary export formats or use a file converter.
- Webcam Issues: Check connections and permissions for your webcam. Ensure no other applications are using it.
